Foundations of Measurement Plans --
The Path to Automation
 Metrologists are often faced with measurement processes that are repetitive and time consuming. It’s not uncommon for a set of measurements to be taken repeatedly under different conditions and with different materials in order to maintain quality control. Afterwards, the measurements need to be formatted, analyzed, and reports need to be created for review. How many times have you wished you could push a play button and have the software drive the instruments, take the measurements, and build a report?
Foundations of Measurement Plans -- The Path to Automation
Metrologists are often faced with measurement processes that are repetitive and time consuming. It’s not uncommon for a set of measurements to be taken repeatedly under different conditions and with different materials in order to maintain quality control. Afterwards, the measurements need to be formatted, analyzed, and reports need to be created for review. How many times have you wished you could push a play button and have the software drive the instruments, take the measurements, and build a report?
Automation is an obvious solution, but the question metrologists often face is: Is building a Measurement Plan worth the effort, or is it easier to trudge through repetitive, time-consuming tasks?
Learning the process of scripting often deters users from further exploring Measurement Plans and automation, despite the advantages of automation. The purpose of this article is to give a few basic examples of scripting and illustrate how easy it can be to build simple Measurements Plans.
SpatialAnalyzer (SA) offers two approaches to automation:
- Provide the control to automate nearly any operation within SA.
- Provide a simple user interface (bypassing the need to learn a new language or set of syntax) that uses a set of discrete actions in a logical stepwise progression.
Getting Started: Building a Simple MP
To get started in SA’s Measurement Plans, go to Scripts > Create/Edit Measurement Plan to open the MP Editor interface.
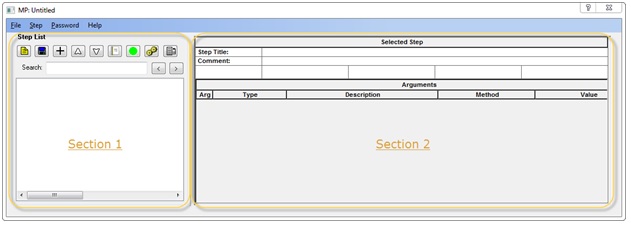
Shown Above: Sections of the MP Editor
Each action that is performed within the script is added as a numbered step in a list of actions. The MP Editor is composed of two sections: the steps in the script are shown on the left and the details of each step are shown on the right.
To script an action, simply press the Add Step (F3) button ![]() , select the action you wish to perform from the MP Function Tree, and add the action to your list of steps. The Function Tree has a search function that makes it easy to find commands by name (the names describe the action to be performed).
, select the action you wish to perform from the MP Function Tree, and add the action to your list of steps. The Function Tree has a search function that makes it easy to find commands by name (the names describe the action to be performed).
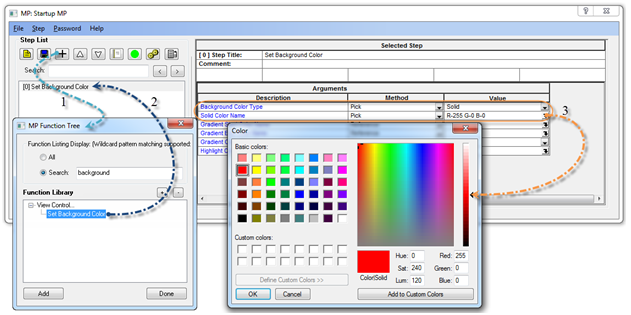
To illustrate the basic steps of building a script, let’s take the example of a script that will allow you to change the background color to a solid color in a single click (Did you know that using a solid background can increase graphic refresh rates and make graphics easier to read?). To build this script, take the following steps:
- Press the Add Step button to bring up the MP Function Tree.
- Select Search and type “background” in the search field (this will filter all the available commands to only display the commands that have this word in the title), select the “Set Background Color” command as the one you wish to add to your script and then press Add.
- As soon as you add a step to the editor, it will appear in the step list on the left hand side of the editor and the definition section will be available for editing. Set the Background Color Type to Solid and use the Pick select method to pick a color from the color selection dialog.
Shown Above: Steps to building a simple MP
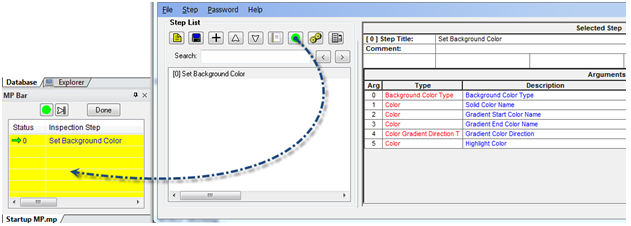
After you’ve completed the steps above, save your first MP (“Startup MP” for example). From there, just press the Run Button in the editor. Or, you can simply drag the MP file into any SA job file and drop it into the graphics display, which will open the script within SA and display the MP Bar at the base of the tree. Press the Start Button to run the MP or the Single Step Button to walk through a longer MP one step at a time.
Shown Above: Running an MP from the Editor
Expanding into a Useful Script
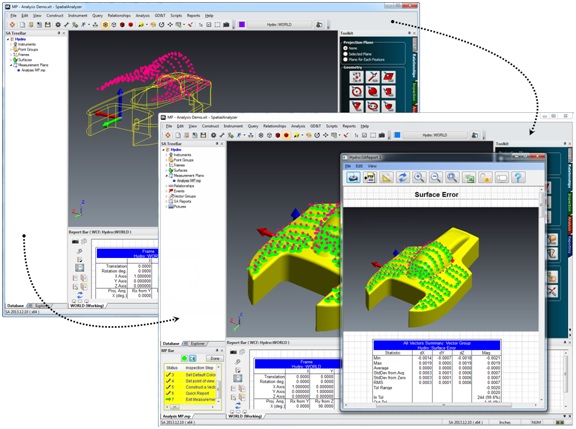
To expand upon that basic script, let’s take a look at an example file. Go to Help > Open Sample Files and select “MP - Analysis Demo.xit.” Within this job file, you will notice an “embedded” MP in the tree. Scripts can be saved externally as a standalone file or saved within a job file for easy access. To run the script, double-click on it to open the MP Bar and press the Single Step Button to step through the script one step at a time. You will see each event occur in order as you walk down the list.
This MP will do the following:
- Set the Render Mode
- Build a Relationship
- Perform a Relationship Fit
- Set the colorization options for the Relationship
- Set the viewpoint
- Construct a Vector Group for the Relationship
- Build a Quick Report
With a single click, this MP takes measurements that are not aligned to a part, aligns them, checks to make sure that they are within a tolerance, captures an image of the measurements of the part, and builds a report.
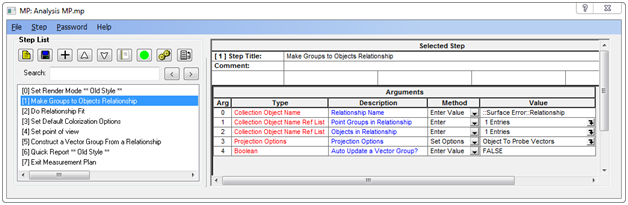
To take a closer look at how it was built, right-click the MP in the tree and select Edit to open the MP in the MP Editor. Click on Step [1] “Make Groups-to-Object Relationship” in the Step List section, which will bring up the details for this step in the right hand section of the editor. You will see that in order to build a Points-to-Objects Relationship, several things must be specified in order for the action to be performed by the script. This step needs five “Arguments” defined: it first needs a name for the relationship, it needs to specify a list of what points to include, and what object(s) to include in the relationship. It also allows you to change the default vector format if you wish and turn on an automatic vector group when the relationship is created.
Shown Above: MP - Analysis Demo script in the MP Editor
By specifying each of these items, you have the control to define a relationship exactly how you wish. You can change the points included in the relationship at any time since it allows you to change the objects included and format the results. Programming isn’t necessary because you can simply pick the items you wish to include from a set of lists already available to you. This makes it a simple process that most anyone can execute.
Taking it another step further, this process can be expanded to include user interaction and feedback, looping, conditional tests, subroutines, and variables, making MPs a fully functional programming language. For users with more advanced programming kills, pressing the gears icon in the MP Editor grants instant access to C++ and Visual Basic code, which can be used to build custom interfaces and drive multiple applications through an external application. However, the important point is that Measurement Plan makes getting started in scripting easy and allows simple applications to be built with minimum effort.
In conclusion, building a simple MP requires the following—first, think logically through the actions you wish to perform in SA, and second, add those actions by name to a script in the order in which you wish them to occur. Once the steps have been added and have been tied to the data they need to run, you have a completed automation that can be used in any SA job from that point on. The potential time savings and gained efficiencies are huge, while the hurdle to getting started is small.
Click here to read the next article that explains more about building MPs.
If you are interested in learning more about MPs and scripting, NRK offers an MP training class that delves into scripting techniques and offers an array of tricks and tricks. Click here for a list of class offerings or contact training@kinematics.com for more information.
Sign up to receive our eNewsletter and other product updates by clicking here.