Building an MP -- Putting the Pieces Together
 In our previous newsletter article, we walked you through the fundamentals of SpatialAnalyzer’s method of scripting called Measurement Plans. We introduced the MP Editor interface and the process of adding discrete commands to build a list of operations, which can be played sequentially in order to automate a task. Building on this foundation, we will illustrate how MPs can be much more than a simple operation recorder.
 Building an MP -- Putting the Pieces Together
In our previous newsletter article, we walked you through the fundamentals of SpatialAnalyzer’s method of scripting called Measurement Plans. We introduced the MP Editor interface and the process of adding discrete commands to build a list of operations, which can be played sequentially in order to automate a task. Building on this foundation, we will illustrate how MPs can be much more than a simple operation recorder.
As an example, let’s begin by building a tool to visualize point offsets. Almost all contact measurement devices utilize a round probe tip for measurement. Since the spherical tip can contact a part in almost any direction, the center position of the probe is recorded along with the probing offsets (see Figure 1). The point location and the probe offset, which includes any additional tooling offset, is then applied when you evaluate the distance from a point to an object. Recording the correct probing offset is as important as recording the correct point location, but offsets are not visually displayed for the sake of saving space and graphic clarity. Instead, offsets are recorded as the property of a point and aren’t used until a comparison to another object is made.
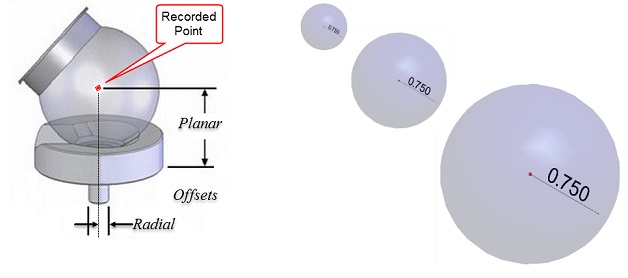
Figure 1 & 2. Recorded Planar and Radial Offsets. This MP will build spheres and dimensions on each point to graphically illustrate the offset.
In many cases, it can be useful to visually verify the accuracy of the offsets recorded with a point. In order to visually display point offsets, we will build an MP that will do the following (see Figure 2):
- Prompt a user to graphically pick points for which they would like to check the offset.
- Build a translucent sphere with a radial dimension around each of the selected points with the size of the sphere equal to its planar offset.
Completing the above tasks manually would be very time consuming, but an MP can break down this task into simple steps that can then be repeated for each point. So let’s get started:
The first step in scripting is to add the actions you wish to perform to the MP Editor through the use of the MP Function Tree. Here we will build a script that will accomplish the following:
- Make a list of points, and then do the following for each point:
- Build a sphere on the point that has the diameter of the planar offset.
- Make the sphere translucent.
- Add a dimension to the sphere.
With that objective in mind, let’s work through the scripting process in order to highlight the important concepts behind building an MP.
Building a List
Building a list of anything within MP is called making a Reference List. The first step in our example MP is to Make a Point Name Ref List—in other words, a list of point names on which we will perform an action. We would like to prompt the user to pick the points graphically, a process called Runtime Selection, so we choose the command called Make a Point Name Ref List – Runtime Select. You will notice that this step only has two arguments to its definition as shown in the right hand side of the MP Editor (see Figure 3). A single input argument (shown in white), which feeds information into the command, and a single output argument (shown in grey), which returns information back to the command. In this case, the input argument (Arg 0) asks for a String (a set of characters), which will be displayed to prompt the user to pick the points used by the script. The second argument (Arg 1) is a return argument containing a list of points that can be referenced by the rest of the script.
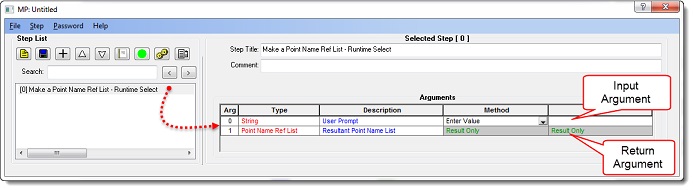 Figure 3. Input and Return Arguments
Building a Loop and Iterating Through a List
In order to use the list we have created, we need to get each item from the list one at a time and perform an operation, which in this case is to build a sphere on the particular point. A series of commands starting with the phrase Get i-th are used to retrieve individual items from a list. In this case, we are going to use a slightly more advanced command called Get i-th Point Name From Point Name Ref List (Iterator), which will automatically return the next point name in the reference list each time the step is executed. In order to tie these two steps together, we need to reference the list we built in Step 0 within this command. To do so, change the method in Arg 0 to reference, press the selection button, and then select the returned list from the first step (Step 0, Arg 1).
This is where the term “loop” comes in. In order to call the Get i-th command to run multiple times, we need to go back to that step repeatedly. Remember that building an MP is like performing a set of actions in order, one after another. However, it is possible to skip steps or repeat them by jumping to a different step in the MP. To do this we need a command named Jump to Step which will cause the progression of the MP to jump to a specified step rather than executing the next step in the editor. By placing a Jump to Step command after the Get i-th command, the MP will get the first point in the list, then jump back to retrieve the next point in the list. In a normal loop, this sequence would repeat endlessly unless you specify a way to exit the loop. Fortunately, the Iterator command keeps track of when it reaches the end of the list and allows you to specify the next step to jump to when that occurs. In order to have somewhere to go when we jump out of the loop, we can add an Exit Measurement Plan step that will close the MP when complete (see Figure 4).
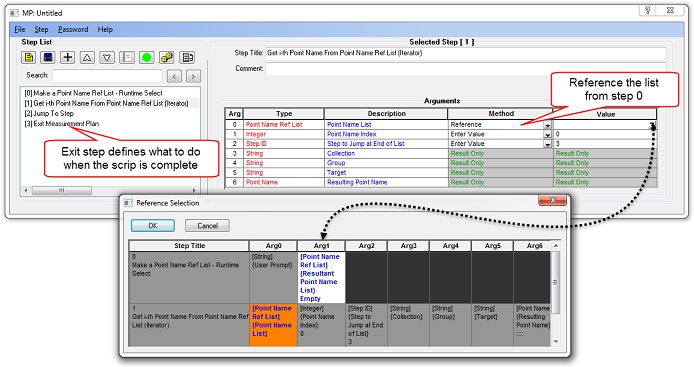 Figure 4. Assigning Arguments for the Get i-th Point Name From Point Name Ref List (Iterator) Command
Filling in the loop
Now that the framework for our loop has been built, we can add steps within it. As the MP progresses, a point is taken from the list and any action added within the loop structure is performed on that point (see Figure 5). For the purposes of this MP we are going to do the following:
- Get Point Coordinate so we can place our sphere in that exact location of the point.
- Get Point Properties to determine the recorded point offsets.
- Construct Sphere using the point coordinates from step 1 and the diameter from step 2.
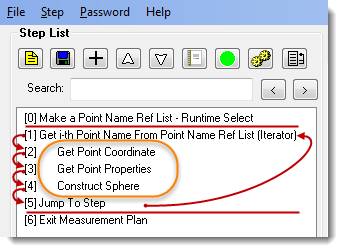
Figure 5. Structure of a loop showing the actions performed for each point
Adding a conditional statement
Building a loop allows you to repeat a portion of an MP script over and over again. Turning this concept around, it is possible to build a conditional statement into an MP by skipping steps or repeating steps depending on what is needed. To explore this concept, let’s add a condition to our MP script: if the probing offset is zero, we will not build a sphere on the point. If the point has an offset, we will construct a sphere. To do this, we can add a Double Comparison (doubles are numbers with decimals), which will look at two values, compare them, and then jump to one step if the condition is met or a different step if the condition is not met (see Figure 6).
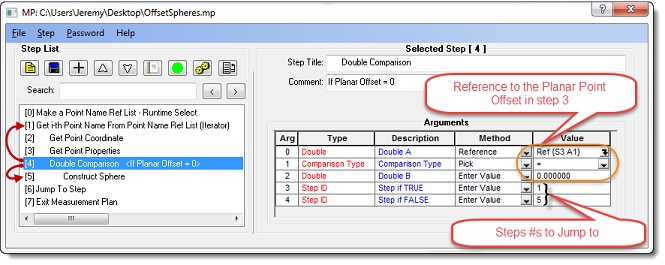 Figure 6. Double Comparison step used as a conditional statement
The Finishing Touches
The final step in building an MP is to add any additional steps to flush out the final script. For the example at hand, let’s add three more steps. First, prior to the loop’s beginning we can set the SA graphics mode to show objects as solids so that our translucent spheres look better. Then, within the loop we can add the commands Set Object(s) Translucency and Create Radius Dimension* (see Figure 7). This will make each sphere translucent and place a dimension on it.
*Note that the ability to add dimensions through MP was added in the SpatialAnalyzer 2014.02.17 beta version. If you are running an older version of SA, you will have to skip adding a dimension.
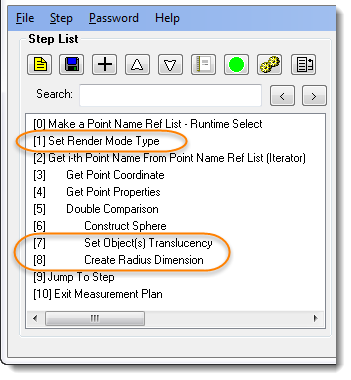
Figure 7. Final additions to our script
With these commands in place, we now need to walk through the MP step by step and make sure that all the required input fields have been added and that each of the steps have been linked together. The easiest way to do this is to use the MP Watcher utility under the Scripts menu (this utility is an ideal tool for this “debugging” application). It records the input values you have entered and the return values as each step is executed and displays them so that you can see their values after the script has been run.

Figure 8. MP Watcher showing how steps are linked together.
This example has illustrated some of the techniques and thought processes behind building an MP, but we’ve only scratched the surface of what is possible with MPs in SA. If you are interested in learning more, NRK offers an MP training class that delves into scripting techniques and offers an array of tricks and tips. Learning to optimize a script can greatly increase efficiency on the job. For example, in our script, you can move the Get Point Coordinate command inside the comparison loop, since we only need the coordinate of the point if we’ve determined that we are going to build a sphere. This simple step will speed up the script by skipping steps when they are not needed.
If you are interested in learning more about MPs and scripting, NRK offers an MP training class that delves into scripting techniques and offers an array of tricks and tricks. Click here for a list of class offerings or contact training@kinematics.com for more information.
Sign up to receive our eNewsletter and other product updates by clicking here.