How to Get Accurate Time Stamps with Points in SA
 NRK’s support team often gets questions about time stamps associated with tracker measurements. As you may have noticed, measurement data from a tracker is only reported to the nearest second within SA. Read on to find out why, plus how to measure at precise increments and how to obtain sub-second timestamps in SA.
 How to Get Accurate Time Stamps with Points in SA
NRK’s support team often gets questions about time stamps associated with tracker measurements. As you may have noticed, measurement data from a tracker is only reported to the nearest second within SA. Read on to find out why, plus how to measure at precise increments and how to obtain sub-second timestamps in SA.
The first thing to consider is that the vast majority of measurements are averages, not individual samples. If you are measuring “discrete” or average points over a period of one half to two seconds, time stamps may not be meaningful. Precise time stamps mainly have relevance when taken from a single sample obtained from a stream of points where the time and sample correspond. In addition, time can be lost during the starting or stopping of a scan, so precise time can be most accurately compared between samples taken within a single scan operation.
Obtaining measurements at exact increments:
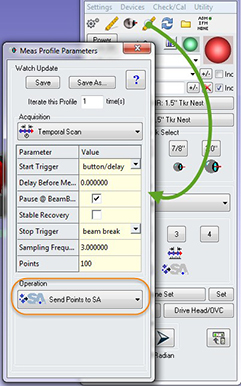
If you need to measure at a particular rate, using a custom measurement profile will allow you to set any specific rate that suits your needs. For example, a basic temporal scan profile that will take a single sample at an exact time period is simple to create. Start by opening a "Watch Update" profile. You will see the Acquisition is set to "Temporal Scan" and the Operation is set to "Send Updates to SA.” If you change the Operation to “Send Points to SA,” you will have created a Temporal Scan profile. Just use the “Save As” button to define and save that new profile so that you can use it again later.
Measurement profiles can be edited and adjusted as needed. When you save measurement profiles, they are saved in the persistence file. However if you would like them to be saved more permanently, or if you would like to move them to another machine, you can use the folder icon to manage and export your saved measurement profiles in a *.msp file.
Obtaining tracker time with each sample:
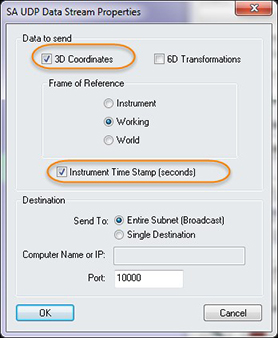
There are applications that require obtaining the exact measurement time with each sample sent from the tracker. When data is sent to SA, it is sent as part of a network packet. Therefore, the time received in SA is still rough even when you break it down per sample. The internal clock on the tracker versus the Windows system clock is extremely accurate, so you need to be able to access that time. Using UDP will allow you to obtain the actual measurement time used by the tracker when each sample was taken. To capture UDP packets you must first tell the tracker interface to transmit the data. Within the tracker interface, go under Utility>UDP Data Stream and turn on 3D updates and Instrument Time Stamps:
The next step is to record the data. Within the install folder for SA, there is a special utility for this purpose called the “SpatialAnalyzer UDP Monitor” which can be run from the start menu:

This utility will display line per line the coordinates and the exact controller time stamp with each sample passed across the UDP network in an asci format. This data can be saved and processed in a spreadsheet program like Excel.
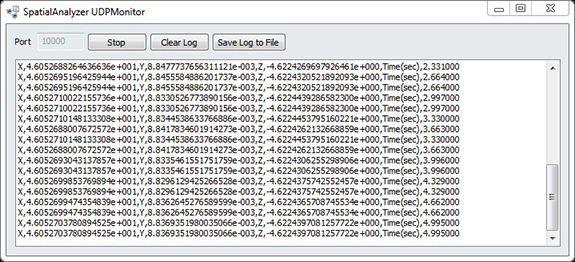
Unlike TCP/IP communication, UDP broadcasting does not require “handshaking” for data transmission. There is no guarantee that transmitted data is received, so some packets can be lost depending on network traffic. This means you are not guaranteed a recording of every sample, but each sample and the time captured with it will be as accurate as the tracker can record.
UDP Data Streaming opens a vast array of possibilities for harnessing tracker data in custom ways. For example, you can write applications to intercept this tracker data and perform custom analysis for hardware control operations, or you can write your own custom watch window applications for near real monitoring processes.
Questions? Do you have any hints or tips of your own that you’d like to share? Contact NRK at support@kinematics.com.
Sign up to receive our eNewsletter and other product updates by clicking here.