How to Customize SpatialAnalyzer
 SpatialAnalyzer (SA) provides a wide range of tools to meet the needs of its users. A variety of options are available to help you customize the look and feel of SA, which can help increase productivity, efficiency, and user satisfaction. With the ability to customize SA, you can adjust simple preferences or even design your own interface and launch custom programs. Read on to learn where and how to begin.
 How to Customize SpatialAnalyzer
SpatialAnalyzer (SA) provides a wide range of tools to meet the needs of its users. A variety of options are available to help you customize the look and feel of SA, which can help increase productivity, efficiency, and user satisfaction. With the ability to customize SA, you can adjust simple preferences or even design your own interface and launch custom programs.
User Options
To begin customizing your SA job, start by selecting the Users Options. This is where you can set a wide range of basic controls including units and decimal precision, presets for callouts and vector colorization, and many other display and analysis functions. The majority of these controls are intended to make changes only within the active job file, meaning these settings will not persist to new jobs. The controls under the Machine Configuration tab; on the other hand, will persist for new jobs as well. This is where you can set your default working directories, units, and decimal precision.
Language Translation
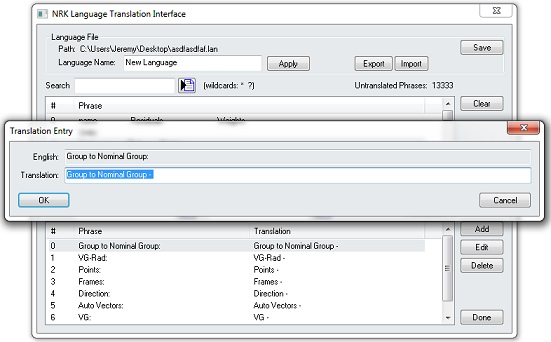
Language translation can be adjusted in two different places in SA. Under File> Language Translation is a set of default translations which allow easy conversion from one language to another. SA currently supports eight stock languages: Chinese, English, French, German, Italian, Portuguese, Russian, and Spanish.
In addition to these stock languages, SA allows you to either edit a copy of the stock language or build your own language translation file to specifically match your needs. To do this, go to the Users Options> Display (Tab)> Custom Language File and either edit an existing language file or build a new file entirely. This gives you full control to adjust specific phrases in your translation file as needed.
Template Files
When you start up SA or open a new file, it automatically opens in a “factory default” configuration. This configuration can be changed through the use of a template file. Any job file can be saved at any point as a template file, and any template file can be set as the new “default” template and then be used for the initiation of any new job. This can be helpful if you wish to pre-setup one or more files that can be used as starting points for future work. Not only can basic settings be adjusted such as user option settings and background colors, but you can preload collections containing reference documents, add instruments, and include reporting templates. They also provide a convenient method for standardizing file setup and settings across an organization.
The only difference between a regular job file and a template is that it is marked as “read-only” and typically stored in a standard folder on disk (C:\Analyzer Data\Templates), although this is not a requirement.
- To save any job as a template file, use File>Save As Read-only Template.
When SA opens it looks for an SA file named “default.xit64” within the templates directory (this location can be changed in the Users Options >Machine Configuration tab). To open a template file other than the default, use File>Open Template File.
Custom User Interface Profiles
While template files allow you to control what is contained within files and the file’s basic settings, a greater degree of customization is possible by building Custom User Interface Profiles. A large portion of the SA user interface is customizable using Custom User Interface Profiles:
- Add, rearrange, delete, and rename menu items,
- Create custom toolbars and menus,
- Save menu and toolbar docking locations,
- Create custom keyboard shortcuts,
- Create or customize icons.
This allows you to modify an interface to display only the commands you use, place them up front and center, and hide unused features in order to leave more room to work. User interface settings are saved as profiles, with an “*.saprofile” extension in the C:\Analyzer Data\Templates directory by default. Once saved, they can later be recalled, or easily transferred to another computer by copying the file into the same directory on another machine. The selected profile becomes the default used when SA starts, and is saved as a machine setting. To build or select a User Interface Profile, use the utility provided through the Main Toolbar:
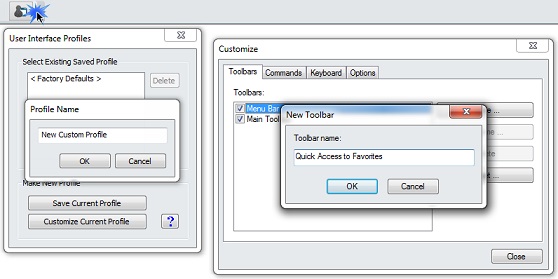
The Toolbars tab allows you to show or hide existing toolbars, as well as create your own. While in the edit mode, any particular command can either be moved or copied from one toolbar to another from the command list directly. Checked toolbars are displayed, while unchecked toolbars are hidden, and both the text labels and the icons for the buttons can be edited. Building a specific toolbar for a particular job process becomes a relatively easy task and this toolbar can be turned on and off as needed.
Reporting Templates
Another area where templates can help significantly is in reporting. SA offers report templates in two basic types:
- Standard Report Templates
- SA Reports designated as template files
Report Templates
Report Templates are templates that offer a repeatable method for creating reports of items from the tree. Once created they can be used repeatedly. Select Reports>Add New SA Report Template from the menu and a report template will be created in the tree. Once the Report Template is designed and saved, a report can be generated from it by simply right-clicking the respective SA Report Template and choosing Generate. When you do so, a report of the type you specify will build with the features you include in the template.
Using SA Reports as Templates
Dynamic SA Reports provide the advantage of full customization and editing capabilities through the report designer. The feature tables added to these reports will update automatically as the data in the job file changes. This makes it possible to prepopulate and design a complete report or even a series of reports prior to the first measurement being taken. Once the measurements are taken, the reports will dynamically reflect these results. This makes it easy to use a prebuilt report as a template.
SA Reports also provide a great deal of visual control. In addition to customizing what is included in a report, SA Reports allow you to design a cover page, edit headers and footers, include logos, and customize tables that are replicated through the entire report. Once built, any SA report can be used as a template and imported from job file to job file. By right-clicking on a particular SA Report in the tree, you can designate it as a default template so any subsequent report built will use that template.
Measurement Plan Script Integration
Measurement Plans (MPs), included in SA Ultimate, add a world of customization to your application. MP scripts can take on repetitive tasks and automate the entire process from start to finish. Scripting also allows you to completely customize and govern a measurement process by controlling instruments, adjusting window sizes and toolbar visibility, building reports, and much more. Below are a couple of shortcuts:
- Quick MPs
- Starting MPs with Command – Line Arguments
Quick MPs
You can assign Measurement Plan scripts to the menus, which allow any script be executed directly from the SA menu (or from a toolbar, if you’ve customized the SA user interface). You can assign up to 30 scripts to Quick MP slots for easy execution. This grants you immediate access to and execution of Quick MPs, providing a library of commonly-used scripts. Once assigned to a particular quick MP slot, you can then use a Custom User Interface Profile to add a new toolbar with the MPs you want for one-click execution.
Desktop Icons with Command- Line Arguments
If you aren’t running SA Ultimate, SA Professional’s series of command-line argument controls provide a degree of automation just from the desktop icon. These include basic operations such as opening a specific file from a directory, adding an instrument, and connecting to an instrument so you are up and running.
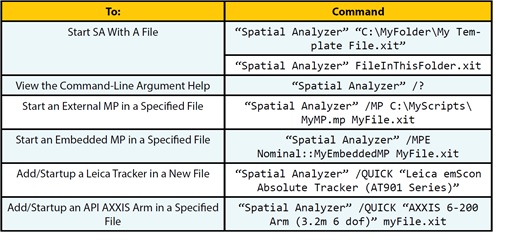
If you are running SA Ultimate and can run MPs, this can be the gateway into complete automation. Through adding command line arguments to desktop shortcuts, you can run an MP that can put all of the pieces together for you; from adding instruments, loading User Interface Profiles, and guiding an operator through an entire measurement process.
Questions about any of the shortcuts explained above? Do you have any hints or tips of your own that you’d like to share? Contact NRK at support@kinematics.com.
Sign up to receive our eNewsletter and other product updates by clicking here.