How to Use Collections in SA
 Could you use a tool that will help you organize your measurements and save time? Read on to learn how using Collections can help you logically group measurements, allowing you to easily refer back to them when necessary. The term Collection is used in SpatialAnalyzer® (SA) to refer to a grouping of objects that can be managed together within the SA TreeBar. A collection can contain any object(s) within an SA job (e.g., Frames, Instruments, Point Groups, Surfaces, Vector Groups, Reports, etc.) and each collection can be separate and distinct within an SA job file.
 How to Use Collections in SA
Could you use a tool that will help you organize your measurements and save time? Read on to learn how using Collections can help you logically group measurements, allowing you to easily refer back to them when necessary.
The term Collection is used in SpatialAnalyzer® (SA) to refer to a grouping of objects that can be managed together within the SA TreeBar. A collection can contain any object(s) within an SA job (e.g., Frames, Instruments, Point Groups, Surfaces, Vector Groups, Reports, etc.) and each collection can be separate and distinct within an SA job file. To look at it another way, each SA job can contain numerous collections that can be organized into a series of distinct measurements of a common object. As an example, a collection with nominal references is used by a whole series of collections, each with a complete set of measurements and analysis of the object. Yet another collection in the same job file can then track the variation of key features between each measurement set.
The concept of Collections of objects in SA is architected in a general way. Several of the primary applications for Collections include:
- Managing a series of measurement jobs each in its own collection in a single SA job file. Collections help organize data to either track an object’s changes through a process or track variation between different units of a part.
- Managing the nominal versus actual dimensional configuration for a series of components within an assembly. Each component and its measurements can be defined as Collections in a job. Analysis and best-fit optimization directly against critical fit and performance features can be done between the parts and their CAD Model.
- Measurement network dependency can be structured in Collections. When using measurements from one system to orient another, it is often useful to keep the job file well organized. Using one Collection to orient the primary instruments and other Collections to orient the secondary systems is a useful technique for keeping the relationship between the systems manageable.
Adding Collections
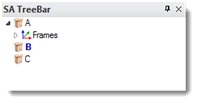
The figure below shows the tree view for a default SA job. By default the first collection is initially named collection “A.”
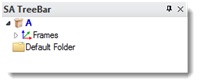
Default Collection "A"
In this case the Collection only contains the World frame. By right-clicking in the database tree view, you can create a New Collection. The figure below shows the right-click menu (click in an empty area of the tree view).
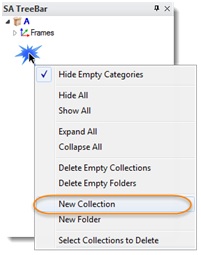
Right-click menu to create a New Collection
Adding a second Collection, i.e., Collection B, to the job and the tree view will look like that shown in the figure below.
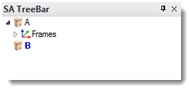
Added second Collection, Collection “B”
Activating a Collection
Only one Collection is considered the active one at any point in time. Once active, any new items added to the database are put into this Collection. To activate a Collection, first select it on the tree view and then use the right-click menu option to “Make active default Collection.” The figure below shows the right-click menu for making a Collection active.
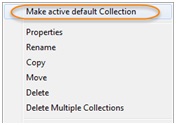
Menu to make active default Collection
The active Collection is shown with a bold font in the database tree view. The figure below shows Collection B as the active Collection.
Collection B as the active default Collection
While B may be the active Collection, the working frame is defined from a frame in collection A. Even though there can be numerous collections, there is only one working frame active in SA. All coordinates information and reports are relative to the working frame. Any new objects (e.g., Points, Instruments, Planes, Lines, and Surfaces etc.) are added to the active Collection.
Deleting Collections
The process for deleting a Collection is consistent with other object types in SA. While the mechanism to delete a Collection is similar, care should be taken when deleting a Collection with instruments or measured targets from instruments in other Collections. The deletion of an instrument with measurements in another collection deletes the measurements to the targets. The targets measured by the instruments are converted to points.
The Delete function for Collections is accessible on the right-click menu when it is selected. The figure below shows the right-click menu with the Delete function circled.
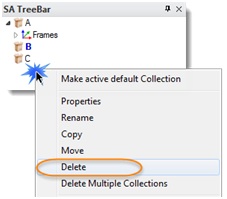
Delete Collection Function
If the deleted Collection was the active one, the active flag is moved to the first Collection in the database.
Renaming Collections
The default names for Collection follow the alphabet. Renaming a Collection is accomplished with the Rename function on the right-click menu. A Collection name is an alpha-numeric string of characters (including spaces). The naming restrictions for objects in SA are the same as those for file names in the operating system. The figure below shows an example of Collection naming.
Renamed Collections
Importing Jobs into Collections
Importing one SA job into another is a common process when different surveys need to be compared. To import an SA job file into the current job, use the Import >>SpatialAnalyzer Job File function found on the File menu. A new Collection is added to the job for each one in the file being imported. This mechanism keeps the objects in each file organized into their own Collections. While they are initially imported into separated Collections, the objects can be accessed for analysis or auto-measurements.
Copy and Move data between Collections
There are a number of methods to copy and move objects between Collections. When objects are copied (with any of the copy methods in SA), the active Collection is the destination for copied objects.
Moving objects from one Collection to another is accomplished with the right-click menu available for each object. The figure below presents an example where the SA Reports in Collection “Analysis” is going to be moved to Collection “Reporting.”

Moving Objects between Collections
After selecting the Move to another Collection function, select the Collection that you want to move the object to from the Select Collection dialog. The figure below shows an example.

Collection selection for Moving Objects
The results of this object move are shown in the figure below (moved from Analysis into SA Reports).
Moved Object between Collections
Questions about any of the shortcuts explained above? Do you have any hints or tips of your own that you’d like to share? Contact NRK at support@kinematics.com.
Sign up to receive our eNewsletter and other product updates by clicking here.